Well, the weather forecast of yesterday was for "Good" visibility has now been changed to "Fair" for tonight. Anyway, this was the night for action, so I decided to take the whole scope setup, mounted on the wheeley bars for easy transport outside with no setup once outside or teardown when the unit is brought back inside. Now as many of you already know, each observing session is an opportunity for new lessons and the teaching opportunities came easily and freely on this night's observing session.
Lesson 1. This month is a great time for viewing the many globular clusters, as we learned from the last OCA meeting what's up presentation by Jim Benet, are easily seen at this time. So that was my observing plan. But, as all of us amateurs know, if you have an observing plan, then also have a backup observing plan in case something goes wrong with the first plan. Well, I didn't have a backup plan, but as we will see as we go down the list of lessons that I eventually was forced to choose and elected to conduct a different observing plan.
Lesson 2. Even though the wheeley bars were upgraded to 5 inch wheels, each transition over the door jamb and over every concrete sidewalk expansion joints left me wondering if the whole thing wouldn't just vibrate to pieces. Actually, it all seemed to hold together ok, but the lesson is that one ought to consider even larger wheels, maybe air filled wheels.
Lesson 3. Ok, it is easy to begin or end an observing session, just 4-5 minutes to roll the whole thing around, but you still are faced with the light pollution in your neighborhood and here at the observatory grounds parking lot, there is plenty of lighting here without worrying about the lights from the surrounding metropolis. See the photo below, which was taken without a flash, but brightened up in Photoshop. It is not conducive to getting your eyes dark adapted, but most of my observing and measurements are done with a camera so it is not as critical what my eyes have to say about it. Ok, that is just what we deal with unless we want to drive to darker skies. Yes, that is my shadow caused by nearby house lights.
 |
| Finally wheeled out the tripod setup with scope and mount already assembled (Source: Palmia Observatory) |
Lesson 4. The stackable plastic see through bins allow all of the needed accessories to be conveniently available. One bine is hard mounted on the wheeley bars and the others just stack on top as needed. That way all sorts of other lenses tools are readily at the observation site.
Lesson 5. Finding Polaris is the usual first step in getting polar aligned, but when you can't visually see Polaris, except by careful squinting and shading your eyeballs, requires some extra work. I found that just panning the scope with camera attached made it easy to find Polaris. The mount was already adjusted for the latitude and the camera gain sensitivity could be temporarily setup to very high, say ISO 3200, so with just a bit of panning back and forth it was easy to find Polaris in the camera Liveview screen. Having the camera in approximate focus helps see the dim star too, but I normally do that as part of the initial check of the red dot finder scope alignment using some nearby house light.
Lesson 6. It is not a good experience when you first turn the mount power switch to ON and you get a "Declination Drive communication error" message on the hand controller. I couldn't believe it. Had I already broken the mount? Well after trying to power on and off and reset the drive a couple of times, I noticed that there was no cable between the declination drive and main mount. Oops, problem solved just go back and get the cable out of the mount shipping container.
Lesson 7. I use an app on my IPhone or Ipad to find target objects in the night sky and it wasn't a good sign when the low battery indicator on the IPhone said that only a couple of percent of charge remained. Now what am I supposed to do? I wanted to use my phone for that night's observing session and didn't want to go without it while it was charging. Ok, just use the portable charging cord that you use in the car to charge the phone and plug that into the mount battery. That way you can still use the phone and it is charging at the same time.
Lesson 8. It is also not a good sign when you first begin alignment and command the scope to move to the first or second alignment star and hear the mount come to a screeching halt and not finish the slew to the target star. Oh-oh, now what? Ok, ok, I see now that the DC power cable connector is binding when the right ascension movement causes the connector to bind against the moving part.
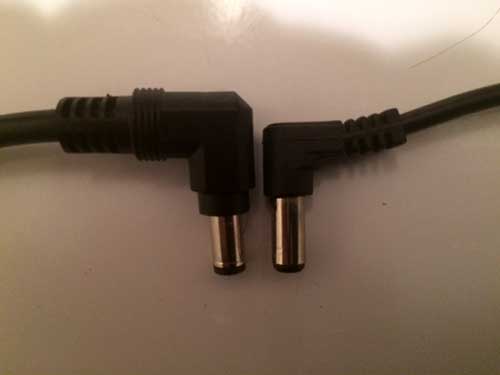
Lesson 9. Just because the right angle DC power cable in the picture on the internet sales sight looked about the same as one you normally use, doesn't mean it is the same. Remember from previous posts that the Ioptron center balanced mount uses a very slim profile right angle DC power plug and I purchased a different one to mate up with the new lightweight Li-ion battery from Revolution Imager.
In this image below you can see the on/off switch on the left and the declination drive cable, now installed, next to that and finally to the right of that is the DC power cable and right angle plug.
 |
| Oops, the new right angle DC power cable has too high profile and causes interference with RA motion |
The photo below shows the recently purchased right angle plug on the left and the original connector from Ioptron is shown on the right. You can see right away that the original plug has a much shallower profile than the new connector and the new connector binds up and can't be used.
 |
| Oops, the purchase replacement on the left is not the same low profile as the original on the right |
Lesson 10. If you need an adapter to connect two different cables or components together somebody somewhere probably makes it. I was wondering if I was going to have to just cut and solder the low profile right angle plug to a cable with the right kind of barrel connector on the other end, but it turns out that I probably can just buy a couple of adapters and just kludge the thing together. Check out this adapter in the screenshot below. See what I mean. The plan goes something like this: Plug the Revolution Imager batter cable into the adapter which connects to a cigarette lighter socket, to which the Ioptron power cable, with the low profile right angle plug on one end, would plug into. Ok, ok, it is a kludge, but it should work. Anybody have another solution?
 |
| Is this kind of connector kludge what is called for? |
Lesson 11. In this lesson, which is the backup observing plan, the need for which was discussed in Lesson 1, we will collect some images of Polaris and then make an estimate of the motion of Polaris and also how well the telescope RA axis was lined up with the north celestial pole. Now, I could have just continued with my initial observing plan and fetched the original DC power cable and switch back to the large lead acid power block, but this revised plan sounded a bit more interesting.
We know that Polaris is about a half degree off from the north celestial pole and we can't just center the scope on Polaris without taking that into account. I used the hand controller option that displays the current Polaris position and I tried, just by eyeballing it to position Polaris off camera frame center, to take that into account. How well did my eyeball guess turn out? If I had completed the alignment process, the hand controller can display the error in pole position, but I didn't complete the alignment and instead elected to take a half dozen images of Polaris and just let the world turn, with the drive turned off, and see how the position of Polaris moves during that period.
Since the world turns 15 degrees per hour, I planned to take an image of Polaris every 4-5 minutes, so that each data point would have moved about a degree as Polaris appears to move in a circle around the pole. So, if the scope has not moved and the camera has not been moved or bumped, then the pixel location of Polaris can be measured and used to estimate the apparent motion of Polaris. This by the way is also a good test of the stability of the wheeley bar mounted scope.
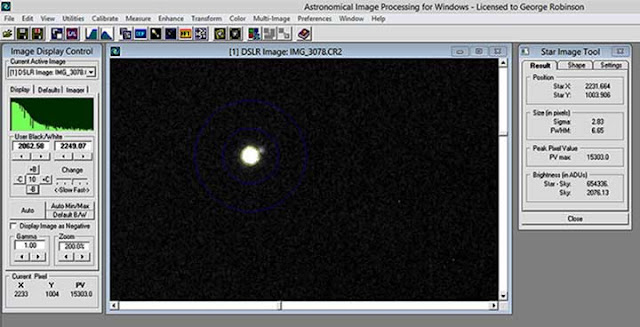
The AIP4WIN screenshot shows Polaris in the first image taken and the pixel location of the star can be identified. This process was repeated four more times and the data is summarized in the table below.
 |
| Ok, lets check the polar alignment and motion using Polaris (Source: Palmia Observatory) |
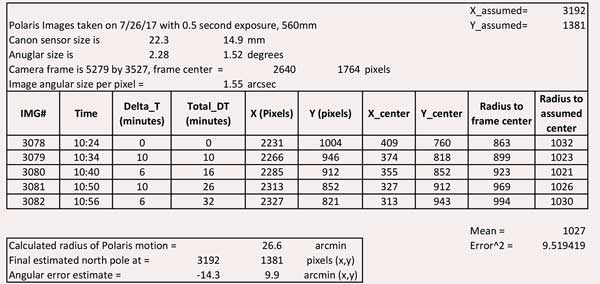
This table summarizes the data and analysis used to measure the distance from the pole. Since this is just my first estimate, I was not diligent with respect to either the time or pixel resolution and only reported pixels to the whole number and time only in minutes, not minutes and seconds of actual duration. I also couldn't recall how to do the least squares method for fitting the data to a circle so just assumed that optimizing the radius estimate with trial and error would be sufficient. Since data analysis and statistics is so key to astronomical analysis, I'll have to assign that as a separate homework lesson later. Anyway, we can see that the star moves about 3-5 pixels per minute and the best least error fit shows the star about 26.6 arc minutes away from the pole. Hey, that is pretty close to the actual value established by the real astronomers! We can also see that my eyeball guess as to where the pole was with respect to Polaris had error offsets between 9 and 14 arc minutes. Ok, I should be able to do better than that next time!
 |
| Analysis of 30 minutes of Polaris movement (Source: Palmia Observatory) |
Lesson 12. Several readers commented about the discussion of using wheeley bars and such to simplify the setup and teardown of the scope for each observing session. Nobody it seems wants to be doing this, even though we all do it when we want to go to a really dark sky location for better viewing and imaging. Also, not everyone has the luxury of having a permanent site setup with observatory dome or roll off roof. So, the lesson here is that several folks are setting up their own rolling mounts and such.
OCA Semiconductor Physicist, John, sent in this photo of his homebuilt rolling mount. The lesson is that homebuilt stuff can be very effective. Pretty neat John! I think you should put an add in Sky and Telescope.
Moved to the Mountains for better viewing, David, talked about another rolling mount that he was considering. I really liked the way this other mount had big rubber inflated tires. He said that installing a more permanent pier at his observatory might be a more ideal course of action. He said he does not want the bears to get involved in observing the site. Wow, and to think that we mostly worried about mosquitoes when we are out observing. Thanks David!
 |
| Wow, Retired Semiconductor Physicist, John, has great homebuilt wheely bars for his tripod and mount |
Until next time,
Resident Astronomer George
There are over 200 postings of similar topics on this blog
If you are interested in things astronomical or in astrophysics and cosmology
Check out this blog at www.palmiaobservatory.com

No comments:
Post a Comment