Greetings from Palmia Observatory
Well here we are getting way behind in describing the previously attended physics colloquia and APS Far West Meeting and now the wonderful Mars Society 2020 conference. Ok, ok, we still plan to offer some comments and slides from those events, but in the meantime, we now report on going out into the night sky with a camera and trying to find the Milky Way in the city lights with a light pollution filter.
I have no specification for how much the filter reduces city light pollution, but let's see what happens when we select the Milky Way as a target and make a trial attempt to to find and photograph it. This particular filter version is screws into the camera's 58 mm telephoto lens.
 |
| This filter is an easy way to try out light pollution filters (Source: Amazon.com) |
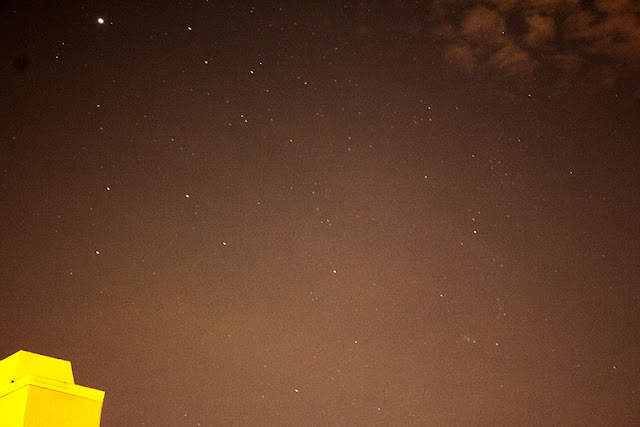
We know that we have never been able to see the Milky Way before in city lights, but so enjoyed seeing it in dark skies, that it was worthwhile to try again. We also know that at this time of year, the Milky Way will be in the sky at the right side of Jupiter, which is visible in the evening. So, with the light pollution filter in place on the DSLR, this image shows Jupiter in the upper left corner and the Milky Way should be somewhere at the right and lower part of the image.
 |
| First look for the Milky Way, DSLR, 55mm, 15-seconds, filter in (Source: Palmia Observatory) |
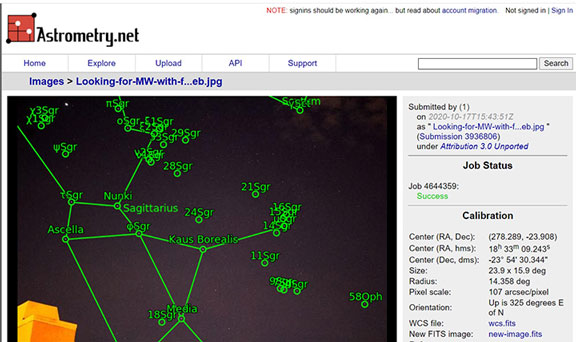
Hmm, Jupiter shows up fine but not much in the way of the Milky Way. Are we actually pointing the camera in the right direction? That is easy to check by submitting the image to Astrometry.net and getting the plate solution from which we can confirm if that is the right location for the Milky Way.
 |
| Just checking astrometry for the search for Milky Way image (Source: Palmia Observatory) |
Yep, the center of the image is pointing at RA = 18 33 09 and Dec = -23 54 30 and we can also see several stars in Sagittarius, which we know lie in the Milky Way. The field of view of the image is 23.9 x 15.9 degrees so we should have a good portion of the Milky Way in this image. Just to make sure, let's check out the Go Sky Watch screenshot below which shows Jupiter at the upper left and the Milky Way in the middle, extending down below the horizon, but still up at that time of night. You can see 14 Sgr in both the astrometry for the camera image and in the Go Sky Watch screenshot, but the dimmer band of white does not show up.
 |
| Go Sky Watch screenshot showing Jupiter and Milky Way (Source: Palmia Observatory) |
Well, it doesn't seem that we will be able to see the Milky Way with this city lights pollution filter. But you can see it helps a little bit. Check out this 15-second exposure image without the light filter. Yeah, there is some subjectivity here because of my Photoshop setting differences between the two images, but the filter did indeed eliminate some of the scattered city lights. One thing that shows up is how much light that is reflected off the bottoms of the clouds is missing in the image with the filter in place.
 |
| First look for the Milky Way, DSLR, 55mm, 15-seconds, without filter (Source: Palmia Observatory) |
One thing that we should still try is to go for a little bit longer exposure. Ok, let's put the filter back on the camera and try for 30 second exposure rather than 15 seconds. The camera is on a non-tracking tripod, but with 55mm focal length, we should be able to get by, even though we will start to see some star trails. Ok, there are star trails, but not much in being able to see the Milky Way,, although there is sort of some hints of the white Milky Way.
 | |
|
There are still some other things I could try to capture the Milky Way in city lights, such as use a tracking mount and go for deeper, longer exposures. But, I think this lazy astronomer wannabe will just wait for the next time we are in a dark sky location. So, lastly, as a consolation prize, with Mars so large and bright in conjunction, here is one final image. This image is a 15-second exposure with DSLR telephoto lens, and pollution filter, set to 55 mm focal length.
 | |
|
Finally, readers may recall our discussion, covered in the blog post of August 21, 2020, of the Galileoscope kit that we had built and used to make some observations. The Galileoscope is a small, about 2-inch diameter refractor used as a STEM training kit. It appeared as a pretty good little scope but I grew tired of holding it and trying to position it, without go to capability, on a lightweight tripod and try to position my iPhone to take images through the eyepiece. So, I decided to give the scope away and donate it to a young student, possibly an astronomer wannabe. Good luck and have fun, Matthew, and don't look at the sun!
 |
| Matthew's mom, Marta, takes possession of the Galileoscope (Source: Palmia Observatory) |
Until next time, here from our burrow, stay safe, as we recover more of our freedom,

No comments:
Post a Comment