Well August 21 and the eclipse is fast approaching. This post covers a practice session to get all the bugs out the proposed eclipse observation plan using just a manually tracked camera and tripod. Many lessons learned are presented and it was certainly a good thing to do this practice before eclipse day.
Before getting to the practice session I wanted to mention a notice to members from AAVSO which passed on a request from Hubble and Kepler K2 space telescope teams for some pre and post observation of a target that they plan to observe later this month and next month too. They ask for AAVSO members to observe the pulsating, white dwarf containing cataclysmic variable, GW Lib, both before their planned observing times and after their planned observing times. This object goes from quiescent mode, magnitude 16, to about magnitude 8 during its flare mode. The professionals want to observe during the quiescent mode and if the AAVSO alerts them in advance that the object is in its flare mode, then the reserved time will be released for other observations, since their scientific observing requirements dictate that the star be observed in quiescent mode. If the object is quiescent then the AAVSO observations are used to tie the main observations together with how the object behaved before and after the main space based observations. They want and welcome visual and spectroscopic measurements. Wow, I am not up to AAVSO observing standards, but hope to get better and get the spectrometer up and running and participate in some of these citizen science type projects.
The practice session was initiated in part due to a question from OCA Science Nerd and Theatre Impressario, Scott, who asked about the use of tracking vs. non tracking mounts for eclipse observation. Now I had elected to just use a non-tracking tripod, due to airline travel constraints, but that means I will have to manually track the sun as it moves across the sky and during totality, exposures longer than say 10 seconds will some star trails. It is a tradeoff isn't it? But since my intention was just to take one or two images during the eclipse, one of the background stars around the sun and another one of the sun's corona.
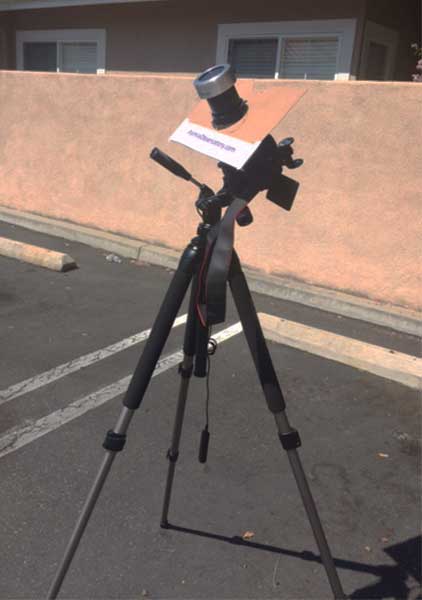
But, I wanted to practice and see just how fast the sun is going to move and how often I would have to make an adjustment to keep the sun in the camera field of view. So the portable camera and tripod was setup outside. See below.
 |
| Setup with 300mm telephoto to practice for August 21 eclipse (Source: Palmia Observatory) |
Well, during this practice session several lessons learned, which will be very useful on that fateful day August 21, when it will have to be done for real:
Lesson learned #1. It's hot out there so bring your good hat and some water. Also, as seen below, I have about 8 minutes to complete a restroom break. I hope that works out ok!
Lesson learned #2. Make sure the portable cardboard sunshade that was made last week is correctly positioned on the telephoto barrel because otherwise it will rotate when you make a focus adjustment. This was easy to do as all it required was to pull the shade a little bit further back on the telephoto barrel.
Lesson learned #3. Check you battery energy level to ensure you will not have to change batteries at the critical point of totality. What I found here was that about half way through my practice session, the battery died. Now, I have a spare battery but then I found I could not replace the battery without taking the camera off the tripod due to mechanical interference with the cover on the camera body. I don't have this problem with the 600mm telephoto, but with the 300mm telephoto the camera is mounted directly itself on the tripod and this causes the interference. If this happened close to totality and I had to take the camera off and fiddle replacing the battery in the near darkness and then try to find and point the camera at the dim sun, well, this would not be a good situation to be in.
Lesson learned #4. Paserbys will be curious and wonder what you are doing. Invite them over to take a look. It's always fun to share. The mailman looked curious but I didn't want to interfere with the delivery with the U.S. Mail.
Lesson learned #5. Separately, I check the TSA website to see if carrying my spare lithium ion batteries would be a problem on the airplane. It turns out you have to bring the spare batteries in with your carry on bags, not in checked luggage. Good to know!
Ok, lets move on to the actual observations made of the sun.
 |
| First 1/1000 second, 300mm image of sun at 11:05 PDT used to verify drift predictions (Source: Palmia Observatory) |
So, the first image of the sun taken at 11:05 PDT is used as the starting point to see where and how fast the sun drifts across the camera field of view. The sun in that image is center at pixels (x, y) = (2872, 291).
The second image shown below was taken at 11:13 PDT. The sun in this image is centered at pixels (x, y) = (4580, 713). Note how the sun drifts to the upper right, which corresponds with the west cardinal point. So., the apparent motion of the sun at this time of day is such at if position of the sun on the camera screen were initially positioned much lower, closer to the bottom, than the drift time could be extended to say, 11 minutes, without risking the image to fall out of the camera field of view
Lesson learned #6: Since my eclipse observational plan is based on a non-tracking mount, there seems to be enough time to just manually keep moving the camera pointing angels to keep the sun in view without worrying about losing it. Of course, you can't leave the camera on its own for more than 8-11 minutes. I also took a few images with the camera rotated to see if I could get the major change in position lined up with the long axis of camera frame.
 |
| Second 1/1000 second, 300mm image of sun at 11:13 PST used to verify drift predictions (Source: Palmia Observatory) |
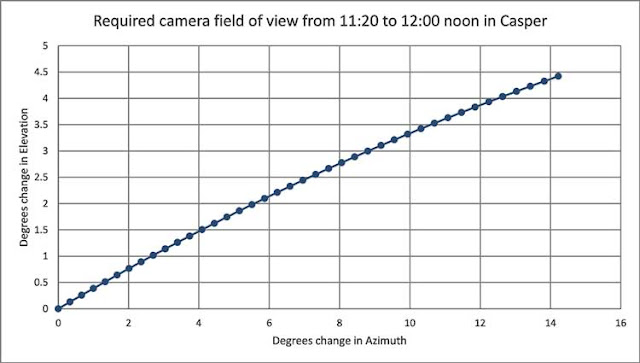
As a further investigation into how much movement of the camera is required in say 20 minutes before totality and 20 minutes after totality, the sun's elevation and azimuth were calculated for August 21. The USNO program MICA was used to calculate the positions of the sun and the changes are plotted below. The camera and associated 300mm lens used to take the two previous photos has a field of view of 2.8 degrees by 4.5 degrees. Each pixel covers a region of about 3.17 arc seconds in each direction. The motion of the sun in those 8 minutes covered a little bit more than 2.1 degrees. So, we can see that some manual adjustment of the pointing angles is going to be required and in fact since we plan to start observing the sun much earlier than the time indicated, more attention adjustment will be required.
 |
| Calculated change in camera pointing angles during the eclipse (Source: Palmia Observatory) |
Did you notice something weird about the amount of change in azimuth in the chart above? The azimuth changed by almost 15 degrees in only 40 minutes! We are used to thinking of the Earth rotating 15 degrees per hour and here our calculated azimuth reading changed by that amount in only 40 minutes. What is going on? My measurement of the sun was that it only drifted 2.1 degrees in about 8 minutes, which corresponds to about 15.7 degrees per hour.
So, one other chart was prepared in which the calculate rate of change of azimuth is plotted over the course of one day. See below. I'm not sure what to make of this high rate of change in azimuth? The plotted rate of change was calculated just using the computed azimuth position on 15 minute intervals and then taking the difference and adjusting back to an hourly rate of change. It is true if you average the rate of change over the whole 24 hours in the day, it averages out to exactly 15 degrees per hour. The sun is not visible over this 24 hour period as an examination of the elevation calculation would show it below the horizon, but we know this of course with our own eyeballs.
 |
| The apparent motion of the sun varies from the assumed 15 degree/hour (Source: Palmia Observatory) |
One other calculation of the rate of change was performed for the observatory here in Orange County, and surprisingly the rate peaked at about 40 degrees/hour. I don't quite know what to make of this curve. You probably have all seen the Analemma, that strange figure-8 curve that shows the apparent motion of the sun over the course of a year, but this apparent high rate of change is hard to understand. We all talk about the sun hanging around at noon time and taking a long time to move across the sky, but this plot shows just the opposite with high rate of change around noon and later.
These plots were generated for topocentric coordinates and I have used them before to predict how high a target object would be and in what direction of the compass the telescope should be aim and they seem to work fine. Knowing the rate of change is critical for eclipse manual viewing because it tells you how often you will be needing to adjust your camera aim. But, I still don't see this high rate of change. If anyone knows how to explain this, please let us know!
Lastly, I took one long exposure (1/15 second) to see how the solar corona would like. The image below seems to show some of the corona and also unexpectedly, a ghost. Eventually, this was tracked down to internal camera reflections coming from the misaligned solar filter. Once, the filter was positioned properly, the solar ghost was pretty much gone.
 |
| Long, 1/15 second exposure shows double image due to internal reflections (Source: Palmia Observatory) |
Lesson learned #7. Be sure to check the installation of your easily removable solar filter and make sure it is mounted perpendicular to the camera optical axis. My easily removable solar filter has some mechanical play possible and sometimes the filter is tilted with respect to the camera axis and can cause double images due to internal reflections. A screw on solar filter probably is not susceptible to this problem. So, check the alignment of the filter prior to getting to the serious solar observing.
Lesson learned #8. Don't get stressed out! My head hurts from all of this learning, so I wanted to share a cartoon I discovered during another learning session in quantum information theory. Anyway it seems that even Dilbert has to worry about the intricacies of quantum mechanics and superposition and measurement theory.
 |
so, Until next time,
Resident Astronomer George
There are over 200 postings of similar topics on this blog
If you are interested in things astronomical or in astrophysics and cosmology

No comments:
Post a Comment